

VRoid用 サイバーフローティング HUD HD - Cyber Floating HUD HD
- ダウンロード商品無料版 (SAMPLE)¥ 0
- ダウンロード商品有償 (PAID)¥ 300
- ダウンロード商品作成支援★ (Creation Support)¥ 900
- ダウンロード商品作成支援★★ (Creation Support)¥ 1,350
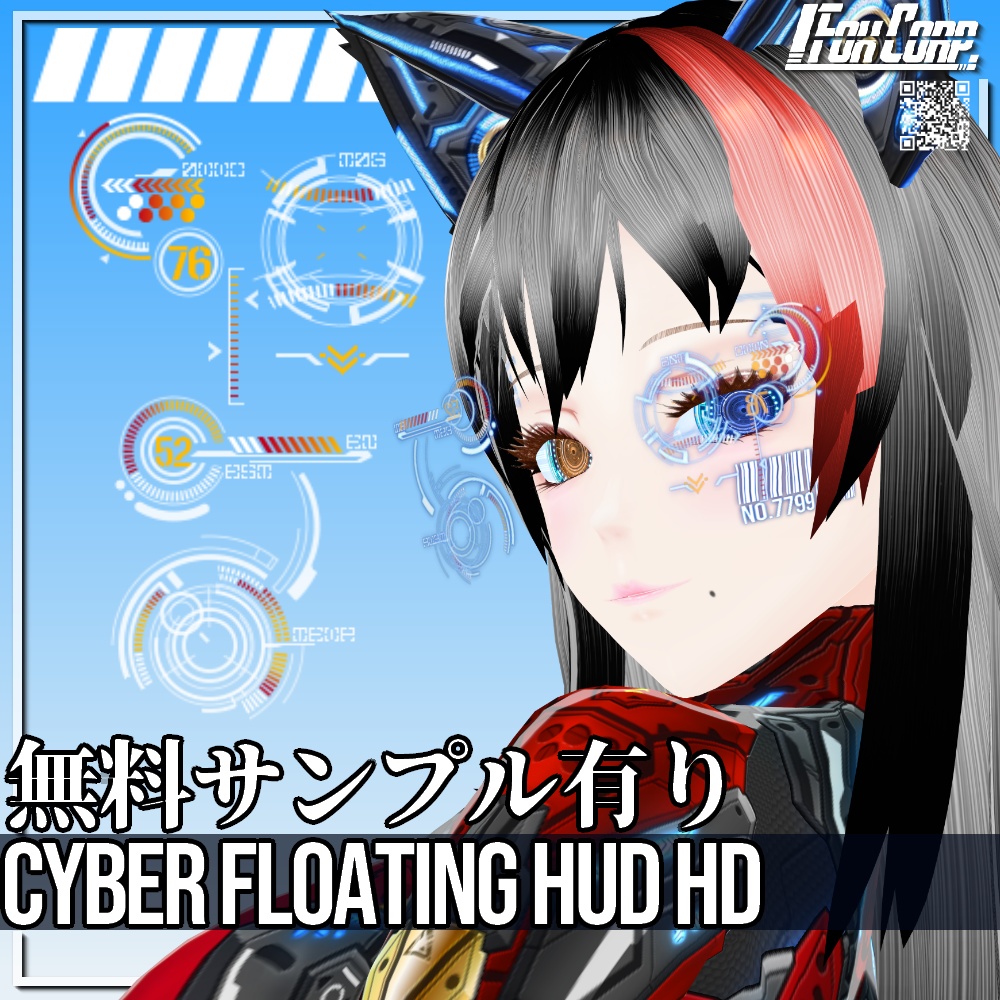
【説明】 ・VRoid用サイバーデザインの空中投影式統合型ヘッドアップディスプレイです。様々な用途にお使いいただけますが、パワードスーツなどをイメージしたディスプレイ内容になっています。 アクセサリーの眼鏡を3個使用することにより、立体感のあるデザインになっており、角度によって見え方が変わります。使用方法は以下の通りです。 1) アクセサリーからフチなしもしくは縁ありの眼鏡を1個設定 2) テクスチャを編集を開き、フレーム部分を非表示とする 3) レンズ部分にテクスチャ「PHUD_A」を設定する 4) 編集画面を閉じ、アクセサリーの大きさ及び位置を調整する まずは拡大縮小を用いてHUD自体を大きくしてください。 この際、右側のクロスヘア部分が目の正面にくるようにすると いい感じになると思います。 位置を調整する際は「前に伸ばす」のパラメーターで調整する と上手くいきます。「PHUD_A」は一番奥(顔側)のテクスチャな のでそのように設定してください。 5) 調整後、設定した眼鏡を「2個」複製する 6) テクスチャ編集画面を開き「PHUD_B」および「PHUD_C」を2個 目と3個目の眼鏡のレンズの「PHUD_A」と入れ替える。 7) 編集画面を閉じ、2個目と3個目の眼鏡の位置を調整する。縦横は そのまま、奥行きだけを調整してください。顔側より順に A>B>C と並ぶようにしてください。奥行き調整には「前に伸ばす」パラ メーターを変更すると簡単です。 アクセサリー5個のうち、3個を占有するため、アクセサリーの個数が足りない場合には、1個の眼鏡に2個のテクスチャを設定することも可能ですが、その場合は立体感が減ります。 ・サムネイルに含まれているテクスチャのうち、商品説明にないものについては含まれておりません。お気に召しましたら別途ご購入ください。 ・無償版にはSAMPLEの透かしが入っています。まずはこちらで使用感をお試しください。 ・有償版および作成支援版2種類には内容の違いはございません。 Description. This is an airborne projection integrated heads-up display with cyber design for VRoid. It can be used for a variety of purposes, but the display contents are designed to resemble a powered suit or similar. By using three accessory glasses, the design has a three-dimensional effect, and the view changes depending on the angle. The usage is as follows 1) Select one pair of glasses without rims or with rims from the "Accessories" menu. 2) Open "Edit Texture" and hide the frame part. 3) Set the texture "PHUD_A" on the lens part. 4) Close the edit window and adjust the size and position of the accessory. First, make the HUD itself larger by using the zoom in/out function. At this time, the crosshair on the right side should be in front of the eyes. This will give a good impression. When adjusting the position of the cross hair, use the parameter "Extend forward" to adjust the position of the cross hair. This will work well. PHUD_A" is the texture on the far side (face side), so set it as such. so set it as such. 5) After adjustment, duplicate the set glasses by "2". 6) Open the texture edit screen and set "PHUD_B" and "PHUD_C" to the second and third lenses. and "PHUD_A" of the lenses of the second and third pair of glasses. 7) Close the edit screen and adjust the position of the second and third glasses. Adjust only the depth of the second and third glasses, leaving the height and width as they are. Adjust only the depth of the glasses without changing the height and width. The order should be A>B>C from the face side. If you do not have enough accessories, you can use two textures for one pair of glasses, but in this case, the 3D effect will be reduced. In this case, the 3D effect will be reduced. ・Textures included in the thumbnails that are not included in the product description are not included. If you like them, please purchase them separately. The free version includes a SAMPLE watermark. Please try this first to get a feel for the software. There is no difference between the paid version and Creation Support Edition.


【利用規約】
・著作権は放棄しておりません。 ・商用、個人を問わずご利用いただけます。 ・R15、R18を問わずご利用いただけます。 ・自由に改変いただけます。 ・商用の場合のみ、クレジットの表記及び当ページへのリンクをお願いします。 ・改変の有無、有償、無償を問わず再配布は禁止します。 ・DLが可能な状態でのモデルデータへの使用は禁止します。 ・VRoid Hub等へ使用されたモデルをアップロードされる場合にはクレジットの表記をいただけると喜びます。 ・テクスチャを使用したモデルでの迷惑行為、中傷行為及び違法行為等を禁止します。
[ Terms of Service ]
・ Copyright is not waived. ・ It can be used by both commercial and individual users. ・ It can be used regardless of R15 or R18. ・ You can freely modify. ・ For commercial use only, please indicate the credit and link to this page. ・ Redistribution is prohibited regardless of whether it has been modified, paid or free of charge. ・It is prohibited to use it for model data when DL is possible. ・ When uploading the model used to VRoid Hub etc., we would be grateful if you could indicate the credit. ・ It is prohibited to harass, slander or illegally act on the model using texture.